Apple pie is a beloved dessert that brings warmth and nostalgia to gatherings, family dinners, and cozy nights at home. What makes this Apple Pie with Pre-Cooked Apple Filling truly special is its thoughtfully prepared filling that allows you to enjoy perfectly tender apples wrapped in a flaky crust. As the aroma of cinnamon and baked apples fills your kitchen, you’ll find it hard to resist a slice (or two!). This recipe highlights the sweet-tart combination of Honeycrisp and Granny Smith apples, making it the ideal choice for any occasion, be it a holiday feast or a casual weeknight dessert.
What Makes This Recipe Special
Why settle for a store-bought option when you can create an apple pie that celebrates seasonal fruits and your culinary skills? This dish is not just delicious; it’s also practical. Using pre-cooked apple filling means less time spent in the kitchen and more time spent enjoying the company of your loved ones. The recipe is straightforward, budget-friendly, and perfect for bakers of all experience levels. Imagine serving this pie at a family gathering; it’s bound to impress!
“This recipe was a game changer! The pre-cooked filling made it easy to prepare, and the pie turned out absolutely fantastic. I’ll never go back to my old method!” — Happy Baker
Preparing Apple Pie with Pre-Cooked Apple Filling
Making this apple pie is a delightful process that brings together the flaky crust and aromatic apple filling in a few simple steps. You’ll start by preparing the crust, chill it, then move onto creating the filling on the stovetop, and finally, assemble and bake your pie to golden perfection. It’s as satisfying to make as it is to eat!
Gather These Items
For the Crust
- 2 1/2 cups all-purpose flour
- 1 tablespoon granulated sugar
- 1 teaspoon Kosher salt
- 1 cup very cold or frozen unsalted butter, cut into small cubes (2 sticks)
- 1/3 cup cold buttermilk
For the Filling
- 4 pounds large apples (about 9 large apples—Honeycrisp and Granny Smith work great)
- 2 tablespoons cold unsalted butter, divided
- 1/2 cup brown sugar
- 1/4 cup granulated sugar
- 1 teaspoon ground cinnamon
- 1/8 teaspoon ground nutmeg
- 1/8 teaspoon ground allspice
- 1/4 teaspoon salt
- Zest of 1 lemon
- 2 tablespoons fresh lemon juice
- 2 tablespoons cornstarch
For the Topping
- 1 large egg
- 1 tablespoon heavy cream or whole milk
- Coarse sugar or turbinado sugar for sprinkling
These ingredients work harmoniously to create a pie that is both beautiful and delicious. If you’re out of buttermilk, a quick substitute can be made by mixing regular milk with a teaspoon of vinegar or lemon juice.
Step-by-Step Instructions
Start by combining the flour, sugar, and salt in a food processor. Add the cold butter and pulse until it reaches a pea-sized consistency. Gradually pour in the buttermilk until the dough starts to come together.
Shape the dough into a ball, flatten it into two disks, wrap them in plastic, and chill for at least a couple of hours.
While the dough chills, prepare the apple filling. Peel, core, and slice the apples evenly. In a skillet, melt 1 tablespoon of butter, then add the apples, sugars, spices, lemon juice, and zest. Cook the mixture for 12-15 minutes until the apples soften.
Mix the cornstarch with a splash of water and add it to the apple mixture. Allow it to thicken, simmering for another 3 minutes, then set aside to cool.
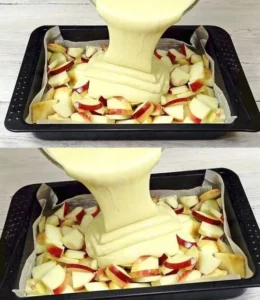
Preheat your oven to 400°F. Roll out one dough disk and fit it into a pie pan. Spoon the cooled apple filling inside and dot with the remaining cubes of butter.
Roll out the second dough disk, cover the pie, seal the edges, and cut slits for steam.
Whisk the egg with the cream or milk and brush it over the pie’s surface. Sprinkle with coarse sugar.
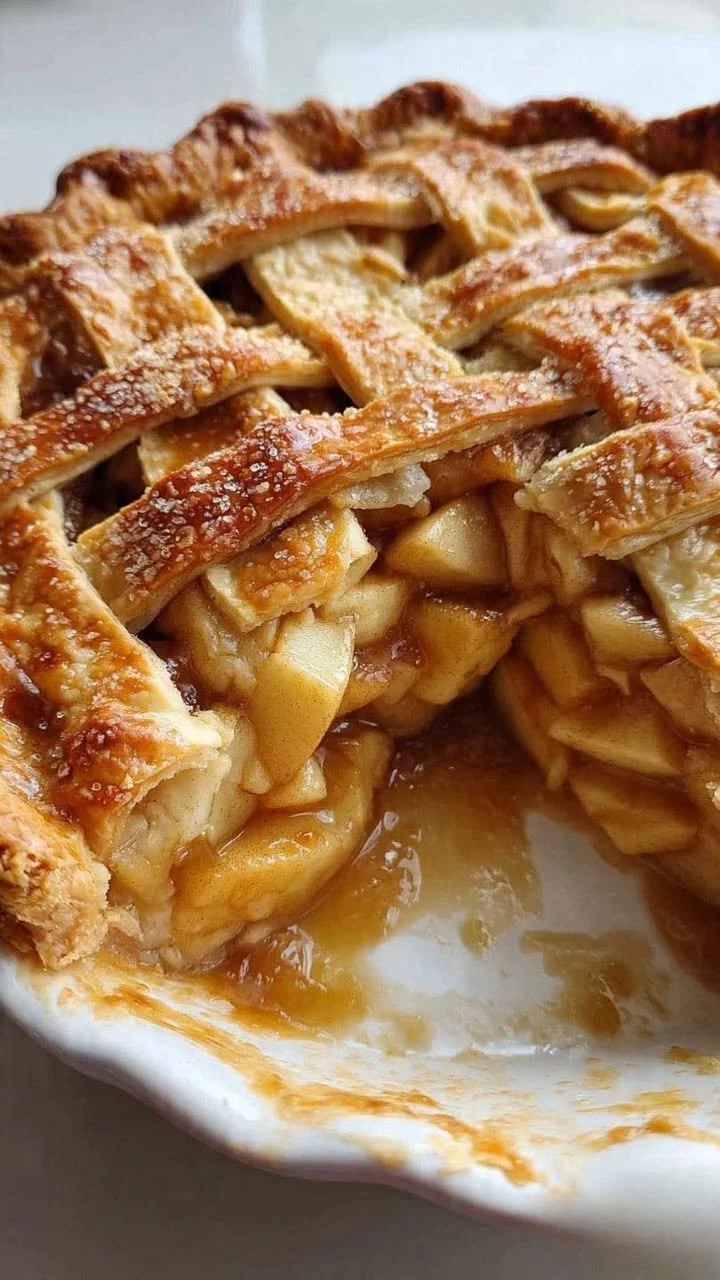
Bake for 20 minutes on a sheet, watch the edges; cover them with foil if they brown too quickly. Then reduce the heat to 375°F and bake for an additional 30-35 minutes until it is golden brown.
Let the pie cool on a wire rack for 3 hours before serving.
Best Ways to Enjoy It
This apple pie is a delightful centerpiece at any dessert table. To serve, offer a generous slice alongside a scoop of vanilla ice cream or a dollop of freshly whipped cream for an unforgettable treat. For a touch of elegance, consider garnishing with a sprinkle of cinnamon or a drizzle of caramel sauce. You can also pair it with a warm cup of spiced cider for a cozy fall or winter evening.
Keeping Leftovers Fresh
To store your apple pie, keep it covered at room temperature for up to two days. If you need to keep it longer, refrigerate it for up to a week. For freezing, wrap the pie tightly in plastic wrap followed by aluminum foil. This helps maintain its quality for up to three months. Thaw overnight in the fridge before serving.
Pro Chef Tips
- For a flakier crust, ensure your butter is as cold as possible when mixing.
- Don’t skip the chilling step; it’s crucial for developing a tender, flaky cake.
- Experiment with different apple varieties to find your favorite flavor combination; a blend often yields the best results.
Creative Twists
Feel free to put your spin on this classic recipe! Add cranberries or raisins to the apple filling for an extra layer of flavor. You can also switch up the spices; for a touch of warmth, try adding ginger or cardamom. If you want to go a bit more indulgent, consider stirring in some caramel sauce into the filling before baking.
![image_2]
Your Questions Answered
How long does it take to make this apple pie?
The total time for this recipe is approximately 4 hours, including chilling time, filling preparation, and baking. Planning ahead will make the process smoother.
Can I use other types of apples?
Absolutely! While Honeycrisp and Granny Smith are fantastic choices, feel free to use Fuji or Braeburn apples for different flavor profiles.
Is it safe to eat leftover apple pie?
Yes, leftover apple pie can be safely consumed within a week if properly stored in the fridge. Just be sure to reheat it well before eating!
This apple pie recipe stands out for its flavorful filling and tender crust, making it a must-try for any baking enthusiast. Whether you’re preparing a family dinner or a special celebration, this pie will shine on any dessert table. Enjoy!