Step-by-Step Instructions
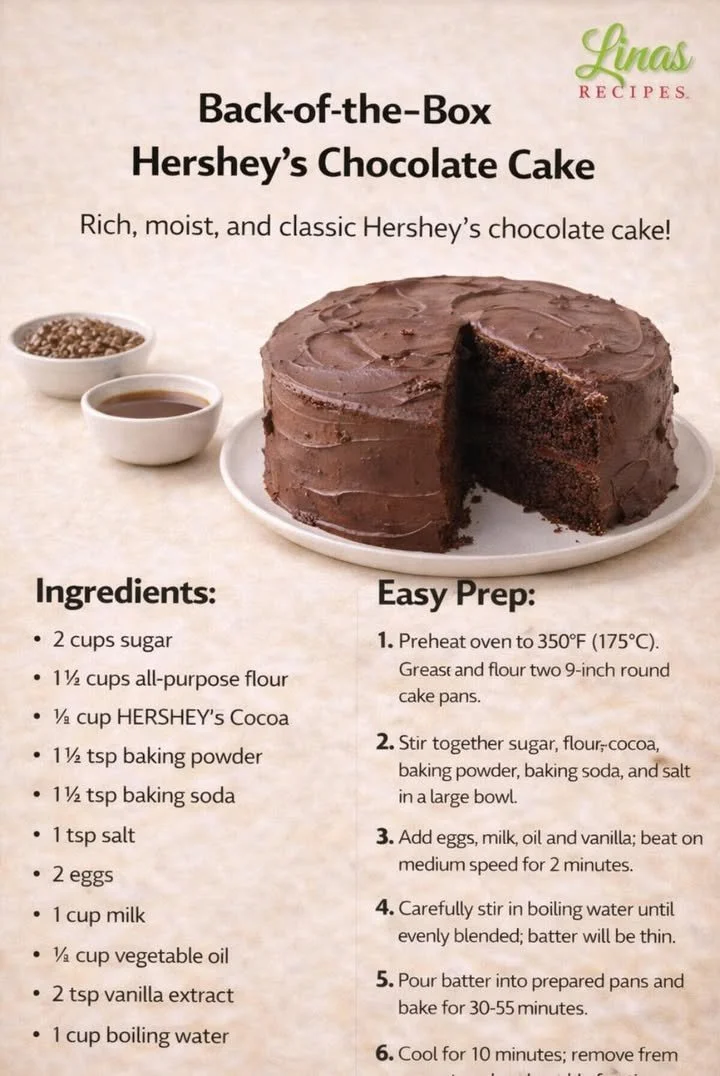
- Preheat your oven to 350°F (175°C). Make sure to grease and flour two 9-inch round cake pans.
- In a large mixing bowl, stir together the sugar, flour, cocoa, baking powder, baking soda, and salt until well combined.
- Add the eggs, milk, oil, and vanilla extract, then beat with an electric mixer on medium speed for 2 minutes.
- Carefully stir in the boiling water. This will create a very thin batter, but don’t worry—it’s supposed to be this way!
- Pour the batter evenly into your prepared pans and bake for 30-35 minutes. Check for doneness by inserting a toothpick into the center; it should come out clean.
- Allow the cakes to cool in the pans for about 10 minutes before transferring them to wire racks to cool completely.
- To prepare the frosting, first beat the softened butter until creamy. Gradually add in the cocoa and powdered sugar, alternating with the milk, beating until smooth. Blend in the vanilla extract.
- To assemble, place one layer of the cake on a serving plate, frost the top, and then add the second layer. Frost the top and sides generously.
- Optionally, decorate with chocolate shavings or sprinkles for an extra visual treat.
Best Ways to Enjoy It
To truly savor this cake, consider serving it with a scoop of vanilla ice cream, a dollop of whipped cream, or even a drizzle of chocolate syrup. For a fun twist, pair it with fresh berries like strawberries or raspberries to offset the richness of the chocolate.
Another delightful option is to enjoy it alongside coffee or milk, making it a perfect treat for an afternoon snack or dessert after dinner.
Keeping Leftovers Fresh
Storing your leftover cake is straightforward. Place any unconsumed cake pieces in an airtight container at room temperature if they’ll be eaten within a few days. For longer storage, you can refrigerate it, but remember that refrigeration can dry out the cake slightly.
If you want to keep it for an extended period, consider freezing the cake. Simply wrap slices in plastic wrap or foil, and store them in a freezer-safe container. When ready to enjoy, thaw at room temperature before serving.
Helpful Cooking Tips
Here are some tips to elevate your baking game with this recipe:
- Make sure your ingredients are at room temperature before mixing for the best texture.
- If you want a denser, richer cake, try adding a bit more cocoa powder or even some espresso powder to enhance the chocolate flavor.
- Don’t skip the boiling water; it activates the cocoa powder and helps create a moist cake.
- For a twist, consider adding chocolate chips or nuts to the batter before baking for added texture and flavor.
Creative Twists
Want to mix things up? Here are some variations you might consider:
- Mint Chocolate Cake: Add a few drops of peppermint extract for a refreshing minty flavor.
- Mocha Variant: Incorporate a tablespoon of instant coffee granules to the batter for a mocha delight.
- Fruit Fillings: Layer the cake with raspberry or cherry preserves between the cake layers for a fruity contrast.
- Gluten-Free Option: Substitute the all-purpose flour with a gluten-free flour blend, allowing everyone to enjoy without worry!
Frequently Asked Questions
What is the prep time for this cake?
Preparation takes about 15-20 minutes, and the baking time is approximately 30-35 minutes.
Can I use cocoa powder other than HERSHEY’s?
While HERSHEY’S cocoa is a trusted choice for chocolate flavor, any high-quality unsweetened cocoa powder will work well.
How can I make this cake ahead of time?
You can bake the cake a day in advance. Just be sure to wrap it tightly and store it at room temperature. Frost just before serving to keep it fresh.
Is it safe to freeze the cake?
Yes! You can freeze the cake for up to 3 months. Just ensure it’s well wrapped to prevent freezer burn.
By incorporating these steps and tips, you’ll master the Back-of-the-Box Hershey’s Chocolate Cake recipe and create a dessert that delights any crowd! Happy baking!