
Step-by-step instructions
Now that you’re ready with your ingredients, let’s dive into the fun part? Here’s how to bring your Baking Soda Christmas Tree to life:
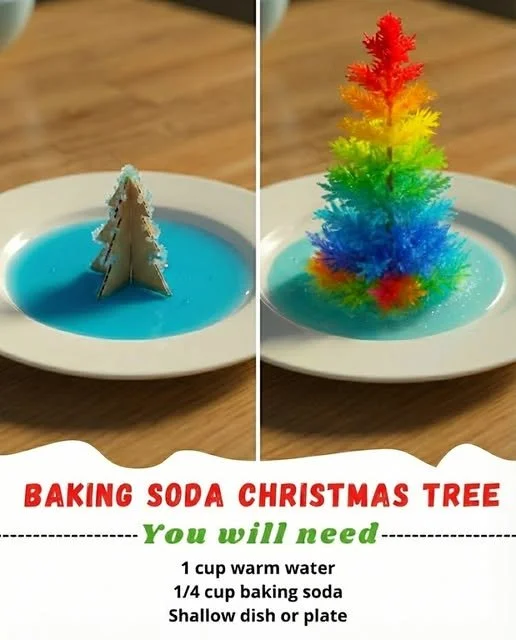
Create the Tree Shape: Start by cutting your coffee filter or thick paper into a simple Christmas tree shape. Want a little added depth? Cut out two identical shapes and make slits to fit them together for a 3D effect.
Add Some Color: Grab those washable markers and unleash your creativity! Color your tree with vibrant stripes or sections—think rainbow or classic colors alike!
Prepare the Crystal Solution: In a cup, stir together the warm water and baking soda until completely dissolved. If you’re up for it, sprinkle in a pinch of salt or some glitter for that extra sparkle.
Begin Growing Crystals: Position your colorful tree in a shallow dish. Then, using a dropper or spoon, carefully drip the baking soda solution onto the base. Watch it soak up that liquid goodness!
Let the Magic Happen: Place your creation in a warm area and let it sit undisturbed for 4–12 hours to grow those beautiful crystals. The longer you leave it, the more impressive your tree will be!
What to serve it with
The Baking Soda Christmas Tree is a wonderful decorative piece that can stand solo or be paired with other festive crafts. Consider complementing it with some homemade ornaments or festive table settings. You could even design a miniature holiday village around it! If you’re hosting, these trees can serve as delightful conversation starters at your holiday gathering.
Storage and reheating tips
Since this project is more decorative than edible, there’s no need for traditional storage methods. However, if you’re crafting multiple trees, keep them in a cool, dry place away from direct sunlight. Avoid heavy handling to prevent any crystal breakage. If you want to make it a multi-day project, just remember to keep your solutions in sealed containers to prevent drying out.
Helpful cooking tips
To ensure your baking soda trees turn out perfectly, here are some pro tips:
- Choose High-Quality Markers: Use washable markers for easy cleanup. They also provide vibrant colors that come alive with the crystal solution.
- Experiment with Colors: Have fun mixing food coloring into your solution for more vibrant trees if you’d like to get creative.
- Maintain Warmth: Ensure the area where you’re letting the trees dry is warm but not humid, as this will help with crystal formation.
Creative twists
Looking for ways to mix it up? Here are a few ideas to add flair to your Baking Soda Christmas Tree:
- Themed Colors: Go for a specific color palette that matches your home décor or holiday theme.
- Add Scent: Use natural extracts (like vanilla or peppermint) in your solution for an aromatic element.
- Light it Up: For a sparkling effect at night, add some battery-operated fairy lights around your tree for an enchanting display.
Common questions
How long does it take to make the Baking Soda Christmas Tree?
From start to finish, including drying time, you should set aside about 4–12 hours depending on how quickly you want those crystals to grow.
Can I substitute the coffee filters with something else?
Absolutely! Any absorbent material can work well, such as thick paper or cardboard. Just ensure it can hold the structure of your Christmas tree.
Is the Baking Soda Christmas Tree food-safe?
No, this is a decorative craft project, and the solution used is not intended for consumption. Make sure to keep it out of reach of young children and pets.
Engaging with such a delightful craft as the Baking Soda Christmas Tree adds a unique touch to your holiday festivities. Not only does it provide a festive atmosphere, but it also acts as a cherished family memory that you can revisit year after year. Happy crafting!
