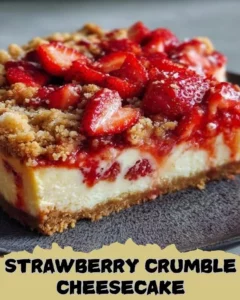
Step-by-step instructions
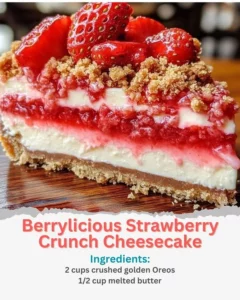
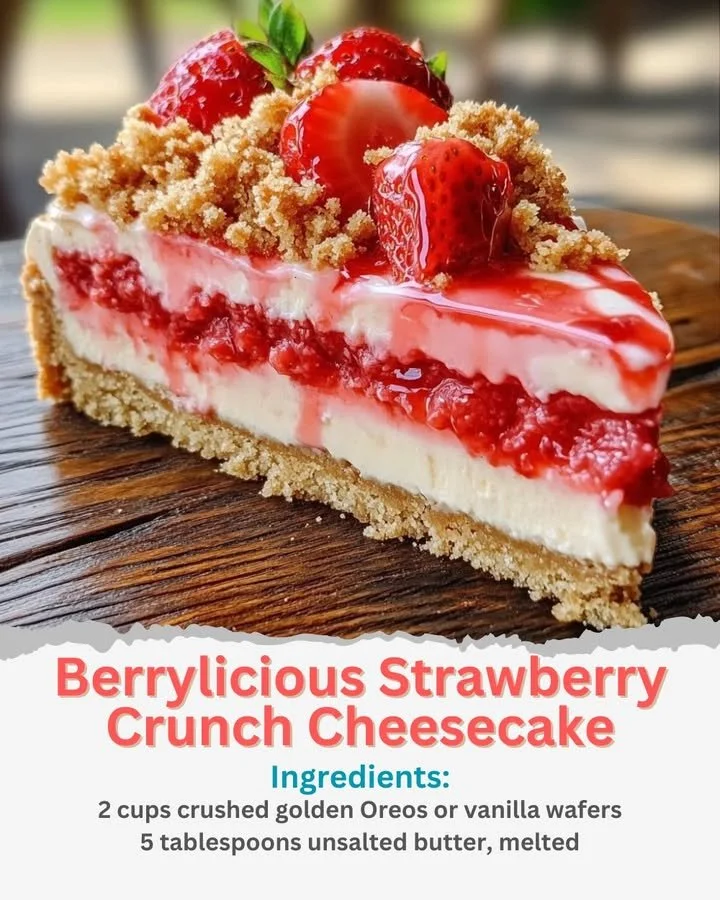
Prepare the crust: In a mixing bowl, combine the crushed golden Oreos with the melted butter. Press this mixture firmly into the bottom of a springform pan. Chill in the fridge for about 15 minutes to set.
Make the cheesecake filling: In a large bowl, beat the softened cream cheese and granulated sugar together until smooth. Stir in the vanilla extract and sour cream. Gently fold in the heavy whipping cream until the mixture is well incorporated. Spread half of the cheesecake mixture over the chilled crust.
Prepare the strawberry layer: In a saucepan, combine the chopped strawberries, sugar, and lemon juice. Cook over medium heat, stirring occasionally, until the strawberries soften. Stir in the cornstarch mixture and continue to cook until it thickens. Let this strawberry sauce cool slightly before spreading it over the cheesecake layer.
Add the next layer: Carefully smooth the remaining cheesecake mixture over the strawberry layer, ensuring an even surface.
Make the crunch topping: In a separate bowl, mix the crushed golden Oreos, crushed freeze-dried strawberries, and melted butter. Sprinkle this mixture generously over the cheesecake.
Chill & serve: Cover the cheesecake and refrigerate for at least 4 hours, preferably overnight. Before serving, garnish with whipped cream, fresh strawberries, and a drizzle of strawberry sauce if desired.
Best ways to enjoy it
The Berrylicious Strawberry Crunch Cheesecake shines on its own, but consider pairing it with a refreshing scoop of vanilla ice cream or a drizzle of raspberry sauce for an extra layer of flavor. For a chic presentation, serve it with additional fresh strawberries on the plates. Whether it’s for a casual family dinner or a formal event, this cheesecake can elevate the occasion.
How to store
After you’ve indulged in this creamy delight, ensure you store any leftovers properly. Keep the cheesecake in an airtight container in the refrigerator for up to 5 days. If you want to store it for longer, wrap individual slices in plastic wrap and place them in a freezer-safe bag. You can freeze it for up to 2 months. To enjoy after freezing, simply thaw it in the fridge overnight.
Helpful cooking tips
- Softening cream cheese: Make sure to allow your cream cheese to get to room temperature. This helps achieve a smoother filling without lumps.
- Whipping cream: For better texture, slowly whip your cream until you get stiff peaks before folding it into the batter. This ensures a light and airy cheesecake.
- Freshness matters: Use the ripest strawberries for the best flavor, especially in the strawberry layer!
Creative twists
Feeling adventurous? Here are a few fun variations to try:
- Different fruits: Swap strawberries for raspberries or blueberries for a delicious berry medley cheesecake.
- Nutty topping: Add chopped nuts to your crunch topping for some added crunch and nutty flavor.
- Flavoring: Consider adding a splash of almond extract to the cheesecake filling for a different aromatic profile.
FAQs
How long does it take to make this cheesecake?
The total prep and chilling time for the Berrylicious Strawberry Crunch Cheesecake is around 4 hours—ideally, you’ll want to let it chill overnight for the best results.
Can I use frozen strawberries in this recipe?
Yes! Frozen strawberries can work; just be sure to thaw and drain them before use to prevent excess moisture in your layers.
How should I serve this cheesecake?
Serve chilled, garnished with whipped cream and fresh strawberries. A drizzle of strawberry sauce also adds a nice touch!
Is this cheesecake suitable for special diets?
For a gluten-free option, use gluten-free cookies for the crust. You can also substitute dairy-free cream cheese and whipping cream to cater to dairy sensitivities.
Serving berry goodness never tasted this good! Enjoy your cheesecake adventure!