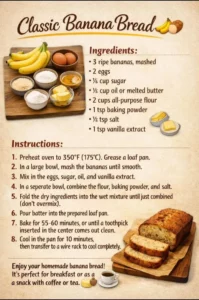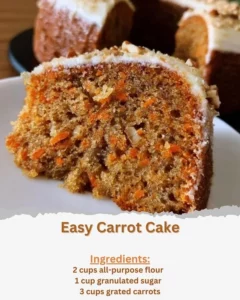
Step-by-step instructions
- Preheat your oven to the specified temperature.
- Mix the dry ingredients in a bowl until well combined.
- In another bowl, cream the butter and sugar until light and fluffy.
- Gradually blend the dry mixture into the wet ingredients until just combined.
- Pour in any mix-ins you’ve chosen and gently fold them in.
- Transfer the mixture to a greased baking dish, spreading it evenly.
- Bake for the recommended time or until golden brown.
- Allow cooling before serving.
Best ways to enjoy it
Once these delightful treats are ready, consider serving them warm with a scoop of ice cream or alongside fresh fruit for a refreshing contrast. You could also plate them as bite-sized squares or triangles that make perfect finger foods for parties. A drizzle of chocolate or a dusting of powdered sugar will add a decadent touch if you want to impress your guests!
Storage and reheating tips
To keep these treats fresh, store them in an airtight container at room temperature, which should maintain their quality for about three days. If you want to enjoy them later, you can freeze them for up to a month. Just be sure to wrap them well to avoid freezer burn. When ready to eat, simply reheat them in the oven or microwave until warmed through.
Helpful cooking tips
- Make sure your butter is at room temperature for an easier creaming process.
- If you’re adding nuts, toasting them beforehand will bring out their flavor.
- Don’t overmix your batter; mix until just combined to ensure a tender texture.
Creative twists
Feeling adventurous? You can swap out regular flour for almond or gluten-free flour, add different spices like cinnamon or nutmeg, or even go savory with cheese and herbs. The possibilities are endless, so feel free to experiment!
Your questions answered
What is the prep time for this recipe?
Preparation typically takes about 15-20 minutes, with baking time varying based on your oven and the thickness of the mixture.
Can I substitute butter with a dairy-free option?
Absolutely! Coconut oil or a vegan butter alternative works well in this recipe.
How do I know when it’s done baking?
Look for a golden brown color on top and a clean toothpick when inserted in the center.
This recipe is as good as it sounds! Dive in, enjoy the delightful process, and let those heavenly flavors light up your kitchen.