Step-by-step instructions
Let’s dive into the fun part! Follow these clear actions to create your easy homemade bread:
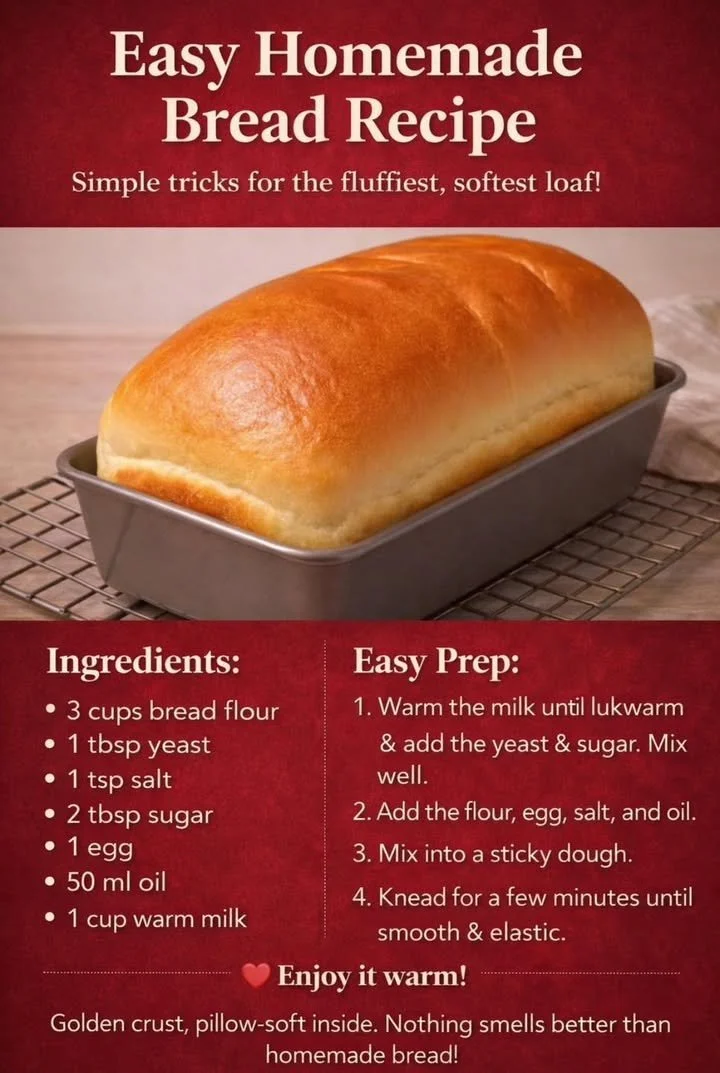
Activate Yeast: Warm the milk until it’s lukewarm (just right should feel comfortable on your wrist). Add the yeast and sugar, stir gently, and let it sit for 5-10 minutes until foamy.
Mix Ingredients: Combine the flour, egg, salt, and oil into the yeast mixture. Stir it all together with a wooden spoon or spatula until mixed well.
Form Dough: Continue mixing until a sticky, shaggy dough forms. Don’t worry if it looks rough; that’s how it should be!
Knead: Turn the dough out onto a lightly floured surface. Knead for about 8-10 minutes until it transforms into a smooth, elastic ball.
First Rise: Place the dough in a greased bowl and cover it. Let it rise in a warm area for about 1 hour, or until it doubles in size.
Shape: Gently punch down the dough to release trapped air and shape it into a loaf.
Second Rise: Place the dough seam-side down in a greased loaf pan. Cover and allow it to rise for 30-45 minutes.
Bake: Preheat your oven to 350°F (175°C). Bake it for about 30-35 minutes until golden brown.
Cool: Remove from the oven, let it cool in the pan for 5 minutes, then transfer it to a wire rack to cool completely.
Best ways to enjoy it
This homemade bread is a versatile masterpiece that can be enjoyed in many ways. Try slicing it for a classic grilled cheese, or toast it up with some avocado and a sprinkle of salt for breakfast. Pair it with a hearty bowl of soup, or simply enjoy it warm with butter or jam. The options are endless!
How to store & freeze
To keep your homemade bread fresh, store it in an airtight container or a resealable plastic bag at room temperature. It should last for about 3-5 days. If you need to keep it longer, consider freezing individual slices to pull out as needed—just wrap them in plastic wrap followed by foil for best results. When thawing, simply leave them out at room temperature or warm them in a toaster.
Helpful cooking tips
Here are a few tips to elevate your bread-making game:
- Yeast Health: Make sure your milk is not too hot when activating the yeast, as high temperatures can kill it.
- Kneading: If the dough is too sticky, feel free to sprinkle additional flour sparingly as you knead.
- Patience in Rising: Allowing your dough to rise fully is crucial for texture; don’t rush this step!
Creative twists
While this recipe is delightful as is, feel free to get creative! Try adding herbs for flavor, or mix in cheese and garlic for a savory version. For a sweet twist, consider incorporating fruits, nuts, or even chocolate chips. The choice is yours!
FAQs
What is the prep time for this recipe?
The total prep time is about 15 minutes, with additional rising and baking times bringing it to around 2 hours.
Can I use all-purpose flour instead of bread flour?
Absolutely! Just remember that all-purpose flour may produce a slightly different texture.
How do I know when my bread is fully baked?
You’ll know it’s ready when it turns golden brown and sounds hollow when tapped on the bottom.
Is it safe to eat bread after storing it for a few days?
As long as it’s stored properly, it should be safe to eat for up to 5 days—just check for any mold.
By following this straightforward and reliable recipe, you’ll soon have a homemade loaf worthy of any occasion. Happy baking!