Directions to follow
- Preheat your oven to 350°F (175°C) and line two baking sheets with parchment paper.
- In a medium bowl, whisk together flour, baking powder, and salt. Set this aside.
- In a large mixing bowl, cream the softened butter and granulated sugar using an electric mixer for about 2-3 minutes until the mixture is light and fluffy.
- Beat in the egg, vanilla extract, and almond extract (if using) until everything is well blended.
- Gradually add the dry mixture to the wet mixture, stirring until just combined.
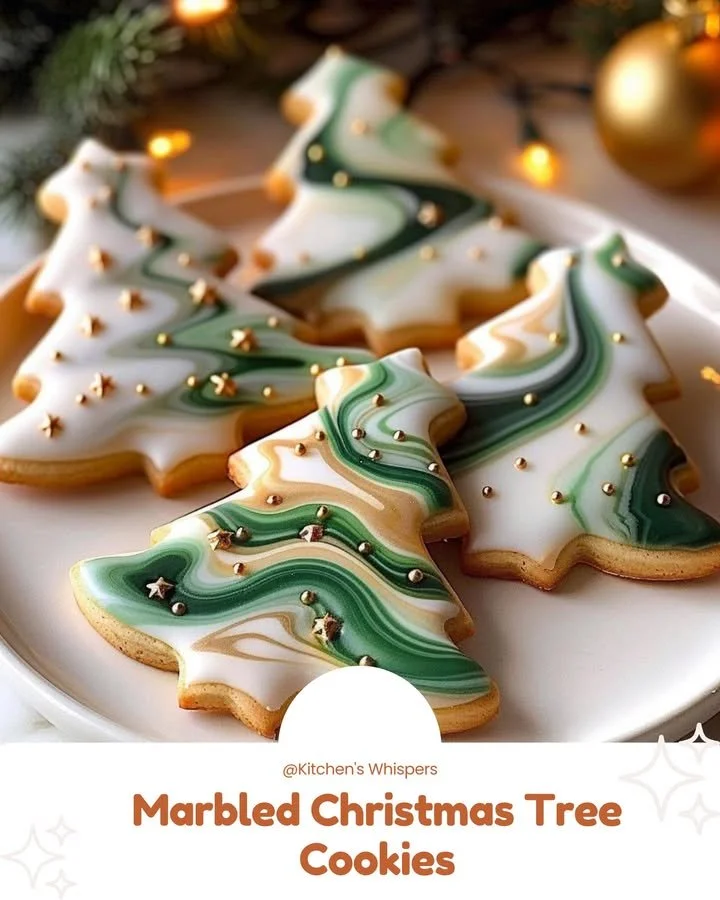
- Divide the dough into two portions. Color one portion green using the gel food coloring, and leave the other portion plain.
- Roll each dough portion into small 1-inch balls. Combine some green and plain dough balls by gently pressing and twisting them together to create a lovely marbled effect.
- Roll out the marbled dough on a floured surface to about 1/4-inch thickness. Use a Christmas tree cookie cutter to cut out your cookie shapes.
- Place the cut-out cookies on your prepared baking sheets, ensuring they are spaced 2 inches apart.
- Bake for 8-10 minutes or until the edges are lightly golden. Allow the cookies to cool completely on the baking sheets before transferring them to a wire rack.
- To make the icing, whisk together powdered sugar, milk (or water), light corn syrup (if using), and vanilla extract until the mixture is smooth. Adjust the consistency if necessary.
- Divide the icing into three bowls. Leave one white, color one green, and the last one gold.
- Ice your cooled cookies with the green icing as the base. Add streaks of white icing over the green and swirl gently for a marbled effect.
- Use the gold icing for decorative accents and sprinkle with edible gold star decorations as desired.
- Let the icing set for about 30 minutes before serving.
Best ways to enjoy it
To truly bring the festive spirit alive, consider displaying your Marbled Christmas Tree Cookies on a beautiful platter garnished with fresh pine needles or holly. Pair these cookies with a warm cup of cocoa, festive spiced tea, or eggnog for a cozy treat. They also make wonderful edible gifts; simply package a dozen in a festive box with a cheerful ribbon.
Storage and reheating tips
If by some chance you have leftovers (though unlikely!), storing these cookies is easy. Place them in an airtight container at room temperature, and they’ll stay fresh for up to a week. If you wish to freeze them, ensure they are completely cooled, then place them in a single layer in a freezer-safe container. They can last up to three months in the freezer. Simply thaw at room temperature when you’re ready to enjoy them again!
Helpful cooking tips
- For evenly shaped cookies, make sure your dough balls are of uniform size before rolling them out.
- If you want a firmer cookie, try chilling the dough for about 30 minutes before rolling.
- Don’t hesitate to get creative with the icing design! You can use a toothpick to create even more intricate marbled effects.
Creative twists
While this recipe is fantastic as is, you can experiment with different flavors or colors to suit your holiday theme. Add peppermint extract for a wintery twist, use pastel colors for a more whimsical approach, or drizzle melted chocolate over the finished cookies for an extra layer of decadence.
FAQs
How long does it take to prepare these cookies?
The entire process, from prep to bake, takes about 1 hour.
Can I substitute the flour?
Yes, you can use gluten-free all-purpose flour as an alternative. Keep in mind the texture might change slightly.
What if I don’t have gel food coloring?
If gel food coloring isn’t available, you can use liquid food coloring; just be cautious with the amount to avoid changing the dough’s consistency too much.
Can I make these cookies ahead of time?
Absolutely! You can bake the cookies a few days in advance. Just make sure to store them properly to keep them fresh.