Step-by-step instructions
Let’s dive into the making of these Peanut Butter Dream Bars!
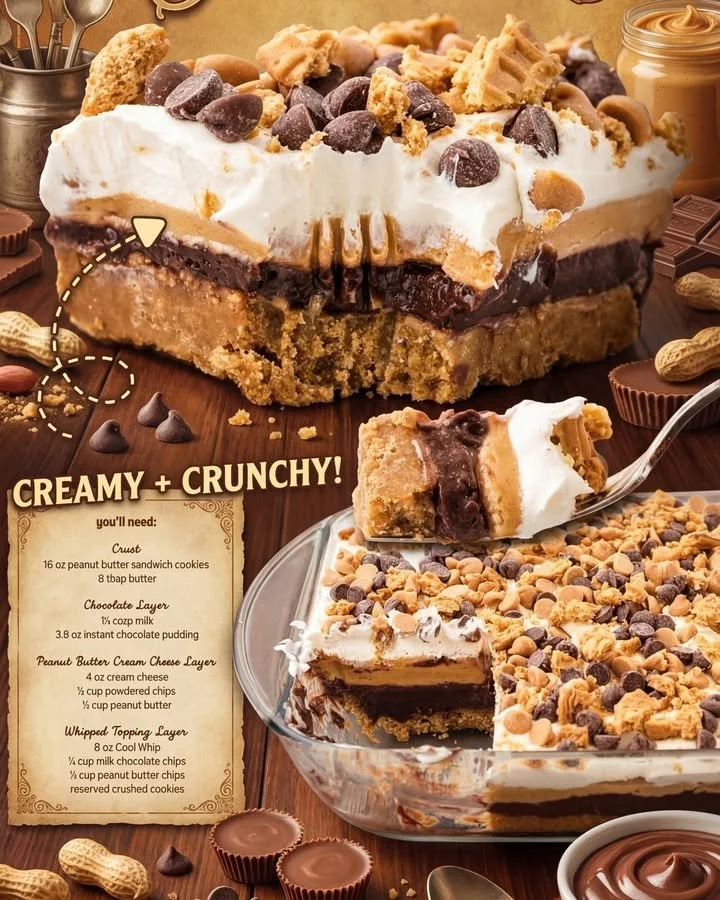
Preheat the oven to 350°F (175°C). Lightly spray an 8×8-inch baking pan for easy removal later.
For the Crust: In a bowl, mix the crushed peanut butter sandwich cookies with the melted butter until combined. Then, press this mixture firmly into the bottom of the prepared pan. Bake for 10 minutes, then allow it to cool completely.
For the Chocolate Layer: In a separate bowl, whisk together the instant chocolate pudding mix with cold milk until it thickens. Once ready, spread it over the cooled cookie crust. Chill this layer in the refrigerator for a while to set.
For the Peanut Butter Layer: Beat the softened cream cheese until smooth and creamy. Gradually add the peanut butter, mixing well, and then incorporate the powdered sugar. Spread this delightful mix over the chilled chocolate layer.
Toppings: Generously spread the Cool Whip on top of the peanut butter layer. Sprinkle a mix of milk chocolate chips, peanut butter chips, and reserved cookie crumbs over the top to add texture and flavor.
Final Chill: Place the assembled bars in the refrigerator for at least 2 hours. When ready, cut into 2×2 inch squares and enjoy this decadent dessert!
Best ways to enjoy it
These Peanut Butter Dream Bars can shine as the main dessert at any gathering! For a delightful presentation, consider drizzling them with melted chocolate or caramel sauce just before serving. Pair them with fresh fruit, a scoop of vanilla ice cream, or a simple cup of coffee to balance out the sweetness. They also make for perfect lunchbox treats or a late-night snack.
Keeping leftovers fresh
To store these delicious bars, simply cover them tightly with plastic wrap or transfer them to an airtight container. They can last for up to 5 days in the refrigerator. If you want to savor them later, wrap individual bars well and freeze them for up to a month. Just thaw in the refrigerator before serving.
Helpful cooking tips
For optimal results, ensure that the cream cheese is fully softened before using to achieve a smooth peanut butter layer. If you’re short on time, feel free to use a food processor to crush the cookies—the finer the crumbs, the better the crust! Also, if you want to mix things up, you can add a layer of sliced bananas or shredded coconut before the Cool Whip topping for an exciting twist.
Creative twists
Don’t be afraid to experiment! You can substitute the sandwich cookies with chocolate cookies for a different flavor profile or use a flavored pudding mix, such as butterscotch or vanilla, to switch things up. For a healthier approach, consider using nut spreads or low-fat substitutes in place of creamy peanut butter. You can also swap the Cool Whip for homemade whipped cream for a special touch.
FAQs
What is the prep time for Peanut Butter Dream Bars?
The overall prep time for these bars is about 30 minutes, not including chilling time. Make sure to account for the 2-hour refrigerator time before serving.
Can I use dairy-free options in this recipe?
Absolutely! You can easily substitute non-dairy cream cheese, almond milk, and coconut whipped topping to make this dessert vegan and lactose-free without sacrificing flavor.
How long do these bars last?
When stored properly in the refrigerator, Peanut Butter Dream Bars will stay fresh for up to 5 days. You can also freeze them for longer storage. Just make sure they are well-wrapped to prevent freezer burn.
Cooking is all about sharing joy, and these Peanut Butter Dream Bars are sure to become a beloved recipe in your kitchen. Satisfy those sweet cravings—enjoy every bite!