Step-by-step instructions
Make the Salted Caramel Sauce: In a heavy-bottom saucepan, heat the sugar over medium heat. Stir constantly until the sugar melts into an amber liquid. Carefully whisk in the butter until melted, then slowly add the cream. Don’t panic when it bubbles! Whisk until smooth and mix in the sea salt. Set aside to cool.
Bake the Cupcakes: Preheat your oven to 350°F (175°C) and line a muffin tin with cupcake liners. In a bowl, whisk together flour, baking powder, and salt. In a larger bowl, cream the butter and sugar until light and fluffy (about 2–3 minutes). Add eggs one at a time, mixing well after each addition, then stir in the vanilla. Incorporate the sour cream, alternating with the dry ingredients and milk, starting and ending with dry. Fill the cupcake liners about 3/4 full. Bake for 18–22 minutes or until a toothpick comes out clean. Let them cool completely.
Make the Caramel Buttercream: Beat the butter until creamy. Gradually add powdered sugar, mixing until combined, then pour in the cooled caramel sauce. Beat until fluffy and smooth, adjusting the consistency with cream or milk as needed. Taste and add a pinch of salt according to preference.
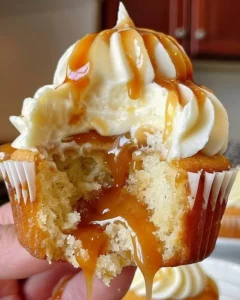
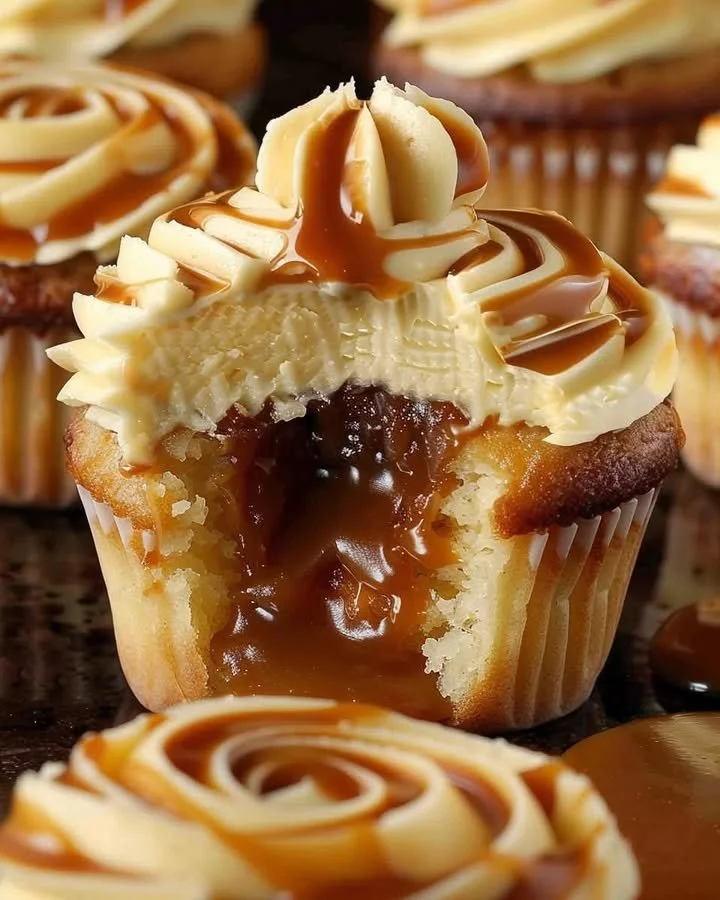
Assemble the Cupcakes: Using a paring knife or a cupcake corer, carve out a small center from each cooled cupcake. Fill the cavities with salted caramel sauce, using a spoon or piping bag. Pipe the caramel buttercream on top, drizzle with additional caramel, and finish with a sprinkle of flaky sea salt.
Best ways to enjoy it
These salted caramel cupcakes shine best when served fresh out of the kitchen, but they also do well at room temperature. Consider pairing them with a scoop of vanilla ice cream for a delightful contrast, or enjoy them with a cup of rich coffee or hot tea — the balance between the creamy frosting and the dark liquid will send your taste buds into overdrive.
For a fun twist, use decorative cake stands or tiered dessert platters to display them at parties. You can even offer a variety of toppings, like extra caramel drizzle or crushed nuts, for a customizable dessert experience!
Keeping leftovers fresh
If you have any cupcakes left (which is a rare occurrence!), store them in an airtight container at room temperature for up to three days. You can also keep them in the fridge for about a week. For longer storage, wrap them tightly and freeze for up to a month. Just remember that the buttercream may get a little soft after being frozen, but the flavors will still shine through once they’re brought back to room temperature.
Helpful cooking tips
- Always watch the caramel closely as it cooks to prevent burning. Sugar can go from perfect to overdone in seconds!
- Let your cupcakes cool completely before frosting. This prevents the buttercream from melting into a messy puddle.
- If you’re short on time, pre-made caramel sauce can be a lifesaver, but homemade adds that authentic touch that’s hard to beat!
Creative twists
Feel free to play with flavors! Try adding espresso powder to your batter for a mocha twist or fold in chocolate chips for added richness. You could even substitute the salted caramel with fruit compote or a citrus glaze for a refreshing take.
| Flavor | Twist |
|———————-|———————-|
| Chocolate | Add cocoa powder to the batter |
| Lemon | Lemon curd filling and zesty frosting |
| Nutty | Pecans or walnuts in the batter and topping |
Common questions
How long do these cupcakes take to make?
From start to finish, you can expect to spend about 1.5 hours, allowing time for both the cupcakes and caramel sauce to cool properly.
Can I use light brown sugar instead of granulated sugar?
Absolutely! Light brown sugar can give your cupcakes a richer caramel flavor.
Do these cupcakes need to be refrigerated?
Not necessarily. They can be stored at room temperature, but refrigeration can help extend shelf life for a few additional days. Just be sure to let them sit at room temperature for a bit before serving.
Baking salted caramel cupcakes is not just delightful; it’s an experience every home baker should partake in. Your friends and family will thank you for these delectable treats that are sure to impress at any gathering!