Cooking Method
Preheat your oven based on the instructions from the cake mix box. Prepare your cake pans with cooking spray or line them with parchment paper to ensure easy removal later.
In a large mixing bowl, combine the red velvet cake mix with the ingredients listed on the box, adding in the optional vanilla extract for enhanced flavor. Mix until just combined.
Divide the prepared batter evenly between the two cake pans and bake as per the package directions. Once done, let the layers cool completely in the pans.
In a separate bowl, whip the heavy cream until soft peaks form. This typically takes around 3–5 minutes of mixing.
In another bowl, beat the softened cream cheese with the powdered sugar until you achieve a smooth, creamy texture. Gently fold in the whipped cream until fully combined for a light and airy filling.
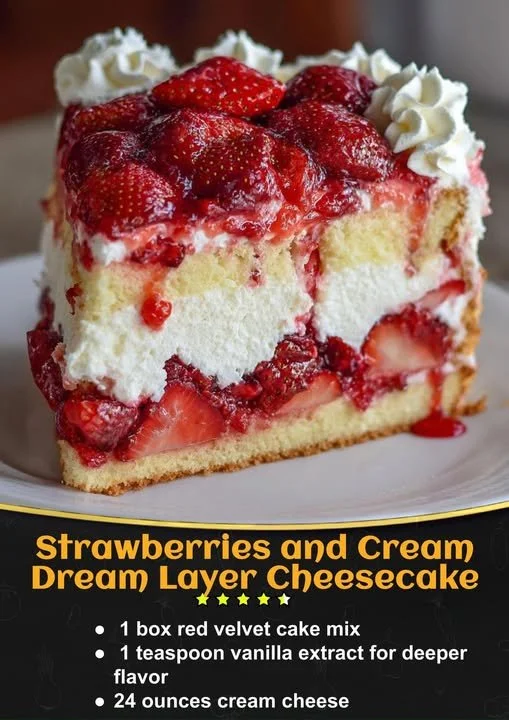
After the cake layers have completely cooled, place one layer on a serving plate. Add a generous layer of sliced strawberries followed by a layer of the cream mixture.
Carefully add the second cake layer on top of the first, repeating the process with strawberries and cream filling.
To finish, top with another layer of the cream mixture and arrange more strawberries on top.
For the best texture and flavor, chill the assembled cake in the refrigerator for at least 2 hours before serving.
Best Ways to Enjoy It
Serving this cheesecake cake is all about presentation and pairing. For a stunning visual, you can garnish with fresh mint leaves, which beautifully contrast with the red strawberries and the cream. This dessert pairs wonderfully with a scoop of vanilla ice cream or a drizzle of chocolate sauce for those who want an extra indulgent touch.
You could also serve individual slices alongside a steaming cup of coffee or a refreshing iced tea, adding a sophisticated flair perfect for afternoon gatherings or brunches with friends.
How to Store & Freeze
To keep your Strawberries and Cream Dream Layer Cheesecake Cake fresh, store it in the refrigerator, ideally covered with plastic wrap or in an airtight container. It’s best enjoyed within 3-4 days, but leftovers (if there are any!) can be kept for up to a week.
If you want to make this cake ahead of time, you can freeze it after assembling. Ensure it is well-wrapped to prevent freezer burn, and when you’re ready to enjoy it, allow it to defrost in the fridge overnight.
Helpful Cooking Tips
- When whipping the heavy cream, don’t rush it! Slow and steady gives the best results, so be patient to reach those perfect soft peaks.
- For an even more decadent touch, consider adding a layer of chocolate ganache or a layer of crushed cookies between the cake and cream layers.
- If your strawberries are overly ripe, you might want to macerate them with a bit of sugar for added sweetness and an even better texture.
Creative Twists
Feel free to get creative with flavors and presentations! Here are some ideas to consider:
- If you’re feeling adventurous, try using lemon curd instead of strawberries for a citrus twist.
- Substitute different berry varieties, such as raspberries or blueberries, for seasonal adaptations.
- For a gluten-free version, use a gluten-free cake mix instead of regular red velvet mix, ensuring your friends with dietary restrictions can also enjoy the cake!
Common Questions
How long does it take to prepare this cake?
Typically, this cake takes about 30 minutes to prepare and then requires baking time as indicated on the cake mix box, plus a chill time of at least 2 hours after assembly.
Can I substitute heavy cream with something lighter?
Yes! You can use half-and-half or a non-dairy whipped topping as lighter alternatives. However, using heavy cream will give you the best texture and richness.
How do I keep the strawberries from becoming soggy?
To help keep your strawberries fresh, consider macerating them just before serving or use them fresh without letting them sit on the cream too long before serving. This ensures they remain firm and vibrant.